Budgeting for your first camping operation is the most critical logistical hurdle for any new recruit. Many beginners make the tactical error of overspending on “high-speed, low-drag” gear before they’ve even spent a single night under the stars. In the field, having a $600 tent is useless if you’ve run out of funds for fuel, rations, and transportation.
Executing a successful budgeting for your first camping operation strategy requires a disciplined approach to resource allocation. You need to distinguish between “mission-critical” gear and “optional extras.” This field manual will show you how to build a world-class outdoor kit without bankrupting your home base, ensuring your first deployment is financially sustainable.
1. The Financial Landscape of Your Operation
Before you deploy to your local outdoor retailer, you must establish a hard ceiling for your spending. Proper budgeting for your first camping operation involves looking at four primary spending sectors:
- Hardware (The Big Three): Shelter, Sleep System, and Pack.
- Logistics: Fuel, permits, and campsite reservation fees.
- Sustainment: Rations, water filtration, and cooking gear.
- Security: First aid, lighting, and navigation tools.
By breaking down your costs into these sectors, you can prioritize where to invest in quality and where to hunt for “surplus” savings.
2. Sector One: Hardware and the “Big Three” Doctrine
When budgeting for your first camping operation, the majority of your capital will go toward your tent, sleeping bag, and sleeping pad. These items define your comfort and safety in the theater of operations.
The Shelter (Tent)
You don’t need a four-season mountaineering tent for a summer mission. Look for “Three-Season” tents from reputable brands like Kelty or ALPS Mountaineering. These provide the best price-to-performance ratio for new operators.
The Sleep System
Never skimp on your sleeping pad. A cheap bag can be supplemented with extra layers, but a cheap pad will let the frozen ground siphon your core heat. In your budgeting for your first camping operation, prioritize an insulated pad with a verified R-value.
3. Sector Two: Operational Logistics and Hidden Fees
A common failure in budgeting for your first camping operation is forgetting the “hidden” costs of the mission that don’t come in a box.
- Permit Intelligence: Depending on your Area of Operations (AO), you may need backcountry permits or vehicle passes. State parks often charge nightly fees ranging from $15 to $45.
- Transportation Fuel: Calculate your round-trip mileage. If you are driving a heavy-duty rig loaded with gear, fuel costs can consume a significant portion of your operational budget.
- Off-Peak Advantage: To maximize your funds, consider mid-week deployments. Many campsites offer reduced rates from Tuesday to Thursday.
4. Sector Three: Sustainment and Rations
You don’t need expensive, pre-packaged “astronaut food” for every meal.
Grocery Store Recon: You can find high-calorie, lightweight rations at any local grocery store. Instant oatmeal, tuna pouches, and Knorr pasta sides are “Budget-Friendly” alternatives to $15 dehydrated camping meals. When budgeting for your first camping operation, “shopping the perimeter” of the grocery store can save you 60% on food costs.
5. The “Base Commander” Tool: TETON Sports Explorer 4000

If you are looking for a “Force Multiplier” that fits perfectly into your budgeting for your first camping operation, we recommend the TETON Sports Explorer 4000 Internal Frame Backpack.
Field Briefing: The TETON Explorer 4000 is the ultimate “Budget Operator” pack. While elite packs can cost upwards of $300, the TETON offers 65 liters of storage and multi-point compression straps for a fraction of that price.
Why it’s Tactical:
- Integrated Rainfly: Most high-end brands charge extra for this; TETON includes it.
- Durability: Rugged 600D polyester construction that survives heavy brush.
- Adjustability: Fits a wide range of torso sizes, making it a safe investment for beginners.
6. Sourcing Surplus: The “Used Gear” Strategy
To achieve an elite kit while budgeting for your first camping operation, you must utilize secondary markets.
- REI Re/Supply: This is where high-end gear that was returned is sold at a massive discount. It’s the “Secret Weapon” of budget-conscious operators.
- Facebook Marketplace Recon: Look for “civilians” who bought expensive gear for one trip and are now selling it for 50% off.
- Rental Ops: Renting gear from an outfitter like REI is a brilliant move. It allows you to field-test premium gear for $30 instead of $300 before you commit to a purchase.
7. Tactical Gear Maintenance: Protecting Your Investment
Once you have executed your budgeting for your first camping operation and acquired your kit, you must maintain it to avoid “Repurchase Syndrome.”
- Dry Storage: Never store a tent wet. Mildew is a gear-killer that will turn your investment into trash in less than a week.
- Uncompressed Loft: Store sleeping bags uncompressed (not in their stuff sacks) to maintain the insulating properties of the fill.
8. DIY Field-Craft: Saving on Accessories
Many accessories can be improvised with household items. Use a plastic water bottle as a “radiant heat core” (see our Winter Camping Guide) or use industrial trash bags as pack liners instead of buying expensive dry bags.
9. Calculating the “Cost-Per-Mission”
The final step in budgeting for your first camping operation is calculating the longevity of your gear. Spending $100 on a pair of boots that lasts 5 years ($20/year) is more tactical than spending $40 on boots that fail after one mission.
Final Debrief
Budgeting for your first camping operation isn’t about being “cheap”—it’s about being efficient with your resources. By prioritizing the “Big Three,” sourcing rations from grocery stores, and utilizing high-value tools like the TETON Explorer 4000, you can establish a professional-grade outpost on a civilian budget.
Mission Ready. Budget Secured.
Tactical navigation for campers is the difference between an elite outdoor experience and a dangerous survival situation. In the wilderness, “getting turned around” is simply a civilian term for a tactical failure. Once you lose your sense of direction, the environment shifts from a training ground to an unforgiving labyrinth.
Relying solely on your instincts is a strategy for disaster; you need a Navigation Triad to maintain positional awareness at all times. For a first-time operative, tactical navigation for campers isn’t just about finding the trailhead—it’s about knowing your exact coordinates, your line of retreat, and your distance to the nearest water source. This 2026 field manual breaks down how to integrate analog tools with satellite technology to ensure you never become a Search and Rescue (SAR) statistic.
1. The Foundation of Tactical Navigation for Campers
Before stepping off the pavement, you must understand that navigation is a proactive process, not a reactive one. Most beginners wait until they are lost to look at their map. A tactical operator uses tactical navigation for campers to constantly “prove” their location on the map using a process called terrain association.
Why Digital-Only Strategies Fail
In the modern era, many rookies rely entirely on smartphone apps. While powerful, these are “single-point-of-failure” devices.
- Thermal Stress: Extreme cold drains lithium batteries in minutes.
- Structural Integrity: Glass screens shatter on granite during a fall.
- Signal Attenuation: Deep canyons and heavy overhead canopy can choke a GPS signal.
Mastering the analog skills of tactical navigation for campers ensures that even if your tech goes dark, your mission continues.
2. Primary Sensor: Topographic Map Intelligence
A map is your most critical piece of intelligence. Unlike a screen, a topographic (topo) map never runs out of power and provides a wide-angle view of the theater of operations.
- Reading the Terrain: Look for Contour Lines. Lines spaced far apart indicate flat ground (ideal for establishing a base); lines bunched tightly together indicate a steep incline or a “cliff hazard.”
- Identifying Handrails: Use the map to identify “Handrails”—natural features like rivers, ridgelines, or power lines that run parallel to your path. If you lose the trail, hitting a handrail will lead you back to a known point.
- The Waterproof Protocol: Never carry a paper map unprotected. Use a transparent map case or print your maps on waterproof “Rite in the Rain” paper.
3. The Directional Gyro: Magnetic Compass Skills
A compass doesn’t just tell you where North is; it allows you to “orient” your map to the actual landscape. This is a core pillar of tactical navigation for campers.
Declination Adjustment
The Earth’s Magnetic North is not the same as True North. This gap is called declination. Ensure your compass allows for manual declination adjustment so your magnetic bearings match your map’s grid. Failing to do this can lead you miles off-course over long distances.
Sighting a Bearing
Choose a distant landmark (a peak or a distinct tree). Use your compass to “lock” that bearing. Even if you have to weave through dense brush and lose sight of the target, the compass will keep you on the correct vector. This is known as “dead reckoning.”
4. Satellite Intel: GPS and 2026 Smartphone Strategy
In 2026, GPS technology provides pinpoint accuracy, but it must be used as a supplement to—not a replacement for—analog tactical navigation for campers.
- Offline Maps: Before deploying, download the entire sector map for offline use. Cellular signals disappear the moment you enter the treeline.
- Track Back Feature: Most modern GPS units allow you to “drop breadcrumbs.” If the fog rolls in or the sun sets, you can follow your digital trail exactly back to base.
- Redundancy: If using a phone, carry a dedicated power bank with at least 10,000mAh of capacity and a ruggedized case.
5. The “Base Commander” Tool: Suunto MC-2 Global Compass
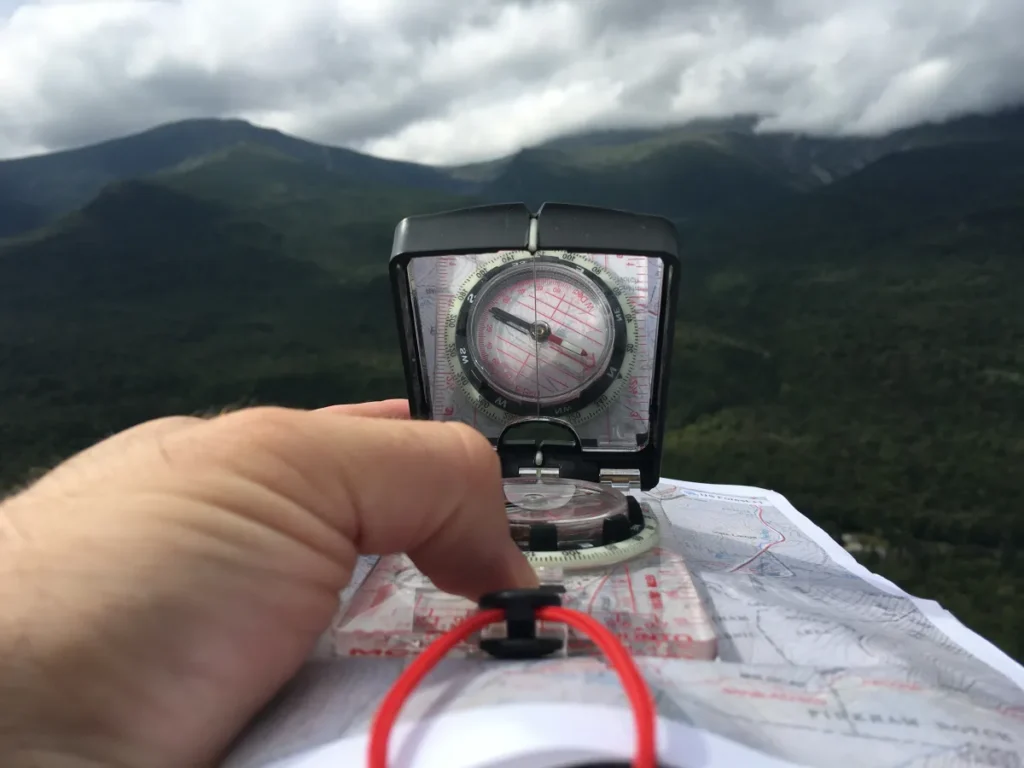
While digital tools are flashy, every elite scout carries a professional-grade sighting compass to execute tactical navigation for campers effectively. For 2026, we recommend the Suunto MC-2 Global Compass.
Field Briefing: The Suunto MC-2 is a “Mission-Critical” tool. It features a large sighting mirror that allows you to take incredibly accurate bearings while simultaneously viewing the compass needle.
Why it’s Tactical:
- Global Needle: It works accurately in both the northern and southern hemispheres without tilting or sticking.
- Clinometer: It features a built-in tool for measuring slope angles—essential for assessing avalanche risk in winter ops.
- Luminescent Markings: Critical for low-light navigation during night-ops.
6. Tactical Navigation for Campers: Standard Operating Procedures (SOP)
To stay found, you must execute these three steps every hour during movement:
- Map Check: Verify your current location against the terrain features you just passed (e.g., “We just crossed a stream and the trail is turning East”).
- The “Thumbs Up” Method: Keep your thumb on the map at your last known location. As you move, move your thumb. This prevents you from having to “re-find” yourself every time you look down.
- Cross-Verification: Compare your GPS coordinates to your map. If the digital and analog intel don’t match, halt the mission and re-evaluate until you have a confirmed position. Never follow a GPS blindly off a cliff.
7. Emergency Protocol: The “Lost Person” Drill
If you realize your tactical navigation for campers has failed and you are truly lost, you must immediately implement the S.T.O.P. Protocol:
- S – Sit Down: Do not keep moving. Panic leads to “wandering,” which makes it harder for SAR teams to find you.
- T – Think: When was the last time you were 100% sure of your location? Can you hear a road or see a familiar landmark?
- O – Observe: Look for shelter, water, and fuel for a fire. Check your supplies and daylight remaining.
- P – Plan: If you have a whistle or signal mirror (like the one on the Suunto MC-2), use it. Signal in groups of three—the international distress signal.
Final Debrief
Navigation is a perishable skill. Don’t wait until you’re deep in the bush to learn how to read a bearing or adjust for declination. Practice in your local park until the interface between the map, the compass, and the terrain becomes second nature.
By mastering tactical navigation for campers, you ensure every mission ends with a successful extraction. For more on the gear required for high-stakes movement, see our [Internal Guide to Tactical Rucksacks]
Trust Your Tools. Verify Your Heading.